Bizuri:PubG Arena/en: Diferență între versiuni
De la B-Zone Wiki
(Pagină nouă: <br /> = The Inventory= * Here you can store and control all objects you pick up from the map (''image #1''). * The inventory can be accessed using the Y key, closed using Escape....) |
|||
| (Nu s-au afișat 3 versiuni intermediare efectuate de un alt utilizator) | |||
| Linia 77: | Linia 77: | ||
<br /> | <br /> | ||
| − | = | + | = The Map = |
| − | * | + | * It represents the area where the game takes place (''image #2''). |
| − | * | + | * Depending on the number of participating players the arena will automatically determine if the game is to be held in 3 cities or just one. |
| − | * | + | * The map is composed of 3 main areas: |
| − | ** <span style="color:# | + | ** <span style="color:#228B22">'''Safe Zone:'''</span> the interior of the blue circle; in this area you are safe from the dangers of the map, not from other players. |
| − | ** '''Neutral Zone:''' | + | ** '''Neutral Zone:''' this is the area between the blue and red circles; this area temporarily protects you from the dangers of the map but keep an eye on the countdown because the area shrinks when the time expires. |
| − | ** <span style="color:red">'''Danger Zone:'''</span> | + | ** <span style="color:red">'''Danger Zone:'''</span> this is the area outside the red circle; this area represents the storm area where you will constantly lose HP depending on the stage of the game you are in (if the circle is big, your HP will decrease slowly, if the circle is small your HP will decrease quick). |
| − | * | + | * These areas on the map are continuously changing when the time on the HUD expires (''image #4''). |
| − | * | + | * In each stage of the match when the timer expires the zones become smaller, shrinking gradually. |
<br /> | <br /> | ||
| − | = | + | = Level = |
| − | * | + | * The arena also has a level system for the players to advance. |
| − | * | + | * At the moment the level of the character doesn't bring any benefits. |
| − | * | + | * There are certain actions which during a game give you points so you can grow in level. |
| − | * | + | * These points can be awarded only once per game. |
| − | * | + | * There is also a maximum points limit per day for a player, 5 times the maximum number of points per match. |
| − | == | + | == List of points == |
| − | * Stage 1 Survitor: | + | * Stage 1 Survitor: survive the first circle, '''5 points''' |
| − | * Stage 2 Survitor: | + | * Stage 2 Survitor: survive the second circle, '''10 points''' |
| − | * Stage 3 Survitor: | + | * Stage 3 Survitor: survive the third circle, '''15 points''' |
| − | * Stage 4 Survitor: | + | * Stage 4 Survitor: survive the fourth circle, '''20 points''' |
| − | * Stage 5 Survitor: | + | * Stage 5 Survitor: survive the fifth circle, '''25 points''' |
| − | * Dangerous Trio: | + | * Dangerous Trio: last 3 alive, '''30 points''' |
| − | * Lone Survivor: | + | * Lone Survivor: win the match, '''70 points''' |
| − | * Murderer: | + | * Murderer: kill 5 enemies, '''30 points''' |
| − | * Serial Killer: | + | * Serial Killer: kill 10 enemies, '''40 points''' |
| − | * Psycho: | + | * Psycho: kill 15 enemies, '''50 points''' |
| − | * Massacre: | + | * Massacre: kill 20 enemies, '''60 points''' |
| − | * Ghost Recon: | + | * Ghost Recon: kill an enemy with a rifle, '''15 points''' |
| − | * First Kill: | + | * First Kill: kill your first enemy, '''5 points''' |
| − | * First Find: | + | * First Find: pick up your first object, '''1 points''' |
| − | * First Weapon: | + | * First Weapon: pick up your first weapon, '''2 points''' |
| − | * Insane Mode: | + | * Insane Mode: find an RPG, '''5 points''' |
| − | * The Mechanic: | + | * The Mechanic: fuel a vehicle with a canister, '''5 points''' |
| − | * Full Backpack: | + | * Full Backpack: fill the biggest inventory, '''10 points''' |
| − | * Master of Elements: | + | * Master of Elements: lose 10 HP in the danger zone, '''10 points''' |
| − | * Clinically Dead: | + | * Clinically Dead: have below 15 HP in a match, '''15 points''' |
Versiunea curentă din 14 aprilie 2020 11:16
The PubG Arena represents a battle royale match, which means that the last player alive will win the game. The purpose of the game is to survive as much as possible, on your own or in a team.
Cuprins
General Characteristics
- The arena can be found using /gps, biz id 159.
- When entering the arena you will first enter the Lobby where you will automatically receive an arena skin.
- The lobby is also accessible even if a match is already ongoing.
- It has an area where you can form teams near the tents, teams can be formed by pressing Y in that spot, as well as an area where you can exist the arena near the hot air balloon by pressing F or Enter.
- While a match is ongoing you can see in the HUD how many players are alive.
- If there is no ongoing match you will see a timer on your screen that announces the start of a new match.
- When starting a match each player pays a tax that goes into a POT which will be given the the player or team winning the match.
- The match starts with all players in a plane above the fighting area, you can jump from the plane whenever you think you are in a good area.
- If you do not jump from the plane you will be automatically ejected at the end of the map.
- The names of players are hidden, you can only see the names of players that killed you.
- Once you have reached the ground your purpose is to gather as much loot to stay alive, to escape or kill enemies and to remain inside the safe zones.
- You can choose a more aggressive play style and search for enemies to kill them or you can be more passive and hide up until the end when the area is as small as possible.
- Certain things you do during a match will give you points that count towards growing in level of your PubG character.
- At this time the character level doesn't have any attributions.
- The player or team of players that remain last alive will win the game.
The Loot
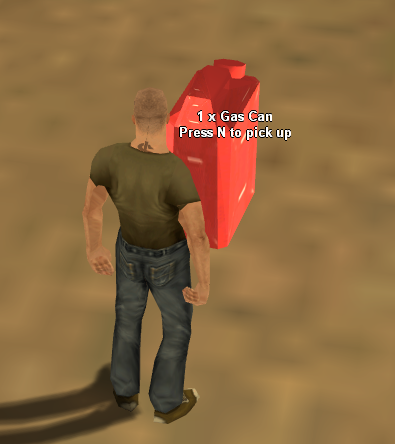
- The loot(image #3) represents the objects that the player can find on the map to help him survive in the arena as much as possible.
- It is divided strategically on all of the game map like so:
- High Loot: represents high loot areas, popular areas, with loot between 21-50 objects.
- Medium Loot: represents middle loot areas, classical areas, with loot between 11-20 objects.
- Low Loot: represents low loot areas, marginal areas, with loot between 3-10 objects.
- You can also find on the map vehicles in the High Loot and Medium Loot areas.
- Objects found can be gathered using the N key and equipped or put in the inventory.
- The stock inventory has a capacity of 350 units.
- The loot spawned on the map is of two types:
- Loot that is random and changes the object in each game.
- Loot that is standard and the object is always the same in each game.

Types of loot
- Medical Kit: gives 100 HP.
- Adrenaline Pill: gives 2 HP/second up to 20 HP max.
- Bandage: gives 10 HP.
- Gas Can: gives 50 Fuel.
- Armour Level 1, 2 or 3: gives 20, 35 or 50 armour.
- Helmet Level 1, 2 or 3: gives 20, 35 or 50 armour.
- Nightstick
- Chainsaw
- Grenade
- Molotov
- Silenced 9mm
- Desert Eagle
- Shotgun
- Uzi
- MP5
- AK47
- M4
- Country Rifle
- RPG
- Backpack Level 1, 2 or 3: gives 500, 650 or 800 backpack capacity.
The Inventory
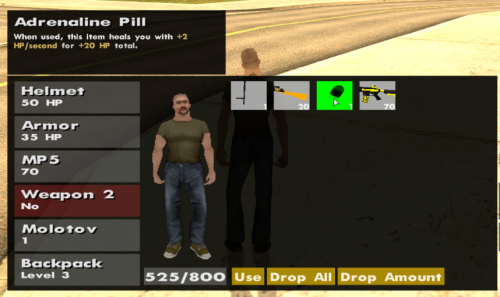
- Here you can store and control all objects you pick up from the map (image #1).
- The inventory can be accessed using the Y key, closed using Escape.
- Selecting an object from the inventory you can see a general description of it.
- The USE button is used for equipping that object.
- The inventory has a slot for white weapons, one for a primary and one for a secondary weapon.
- Because of this you cannot change between two automatic weapons just like in normal sa-mp, but you need to equip your other weapon from the inventory using the USE button if you want to use it.
- The DROP ALL button allows to throw an object with all its ammo.
- The DROP AMOUNT button allows to throw an object with a certain amount of ammo.
- The backpack represents your deposit space in the inventory.
The Map
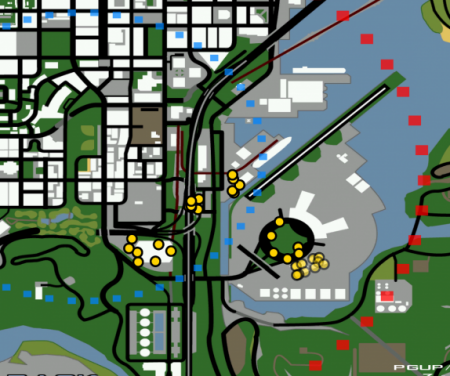
- It represents the area where the game takes place (image #2).
- Depending on the number of participating players the arena will automatically determine if the game is to be held in 3 cities or just one.
- The map is composed of 3 main areas:
- Safe Zone: the interior of the blue circle; in this area you are safe from the dangers of the map, not from other players.
- Neutral Zone: this is the area between the blue and red circles; this area temporarily protects you from the dangers of the map but keep an eye on the countdown because the area shrinks when the time expires.
- Danger Zone: this is the area outside the red circle; this area represents the storm area where you will constantly lose HP depending on the stage of the game you are in (if the circle is big, your HP will decrease slowly, if the circle is small your HP will decrease quick).
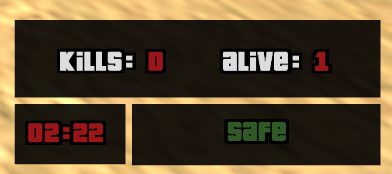
- These areas on the map are continuously changing when the time on the HUD expires (image #4).
- In each stage of the match when the timer expires the zones become smaller, shrinking gradually.
Level
- The arena also has a level system for the players to advance.
- At the moment the level of the character doesn't bring any benefits.
- There are certain actions which during a game give you points so you can grow in level.
- These points can be awarded only once per game.
- There is also a maximum points limit per day for a player, 5 times the maximum number of points per match.
List of points
- Stage 1 Survitor: survive the first circle, 5 points
- Stage 2 Survitor: survive the second circle, 10 points
- Stage 3 Survitor: survive the third circle, 15 points
- Stage 4 Survitor: survive the fourth circle, 20 points
- Stage 5 Survitor: survive the fifth circle, 25 points
- Dangerous Trio: last 3 alive, 30 points
- Lone Survivor: win the match, 70 points
- Murderer: kill 5 enemies, 30 points
- Serial Killer: kill 10 enemies, 40 points
- Psycho: kill 15 enemies, 50 points
- Massacre: kill 20 enemies, 60 points
- Ghost Recon: kill an enemy with a rifle, 15 points
- First Kill: kill your first enemy, 5 points
- First Find: pick up your first object, 1 points
- First Weapon: pick up your first weapon, 2 points
- Insane Mode: find an RPG, 5 points
- The Mechanic: fuel a vehicle with a canister, 5 points
- Full Backpack: fill the biggest inventory, 10 points
- Master of Elements: lose 10 HP in the danger zone, 10 points
- Clinically Dead: have below 15 HP in a match, 15 points


